DIY Dipped Jars
July 7, 2015

DIY projects that don’t just look good but also serve as storage? Count me in. These dipped food jars fit right into that category and they’re so easy to make. The most difficult part of this project was being patient while the paint dried. I actually had to redo some of the jars because I didn’t wait for the paint to dry completely.

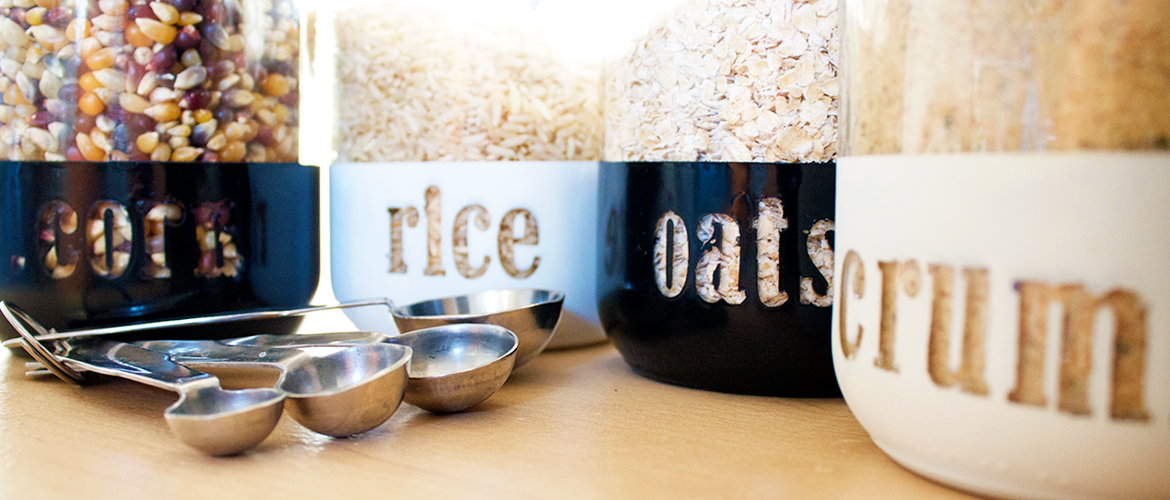
I put different foods in my jars like oats, rice, bread crumbs, and popcorn kernels, but you could use the jars for anything – craft supplies, paint brushes, tools, hardware, or even other foods (flour, sugar, etc). I’ve also seen versions of these where they draw a pattern, like polka dots or chevrons, on the jar with marker after the paint has dried. I kept mine simple black and white to match the motif of my kitchen, but please, feel free to experiment. And, as always, share your finished product with us!

The materials for this project are pretty simple as well. I happened to catch a buy one get one free jar sale at Michael’s and then used my trusty 50% of one item coupon for the foam letters. I already had a few cans of different colored spray paint so the cost for this project was under $10.
Total Cost: Without buying paint, less than $10
Total Time: About a half hour, not including drying time
Materials
Jars
Foam Alphabet Stickers (in the scrapbooking section)
Painter’s Tape
Plastic Bags
Spray Paint

Step 1: Tape off the jar

Before putting your letters on, you’ll want to make a “dip” line where you want the paint to stop. Using painter’s or masking tape make a line, making sure it is straight all the way around the jar. You can make this as far up on the jar as you’d like, just make sure there is enough room for the letters. Press down on the tape firmly and make sure there are no bubbles. To ensure you don’t get any paint on the rest of the jar, cover everything above the dip line with a plastic bag and more painter’s tape.
Step 2: Apply the letters

Begin applying the letters to the jar, starting with the last letter. This is to make sure you don’t run out of space. You don’t need to press these down a whole lot. If they’re stuck too firmly to the glass, you may have some trouble peeling them off later.
Step 3: Spray paint the heck out of the jar

Once you have the letters where you want them, turn the jar upside down and spray paint the jar until the “dip” area is covered completely. Do this in a well ventilated area, on a surface that you don’t mind getting paint on (newspaper, trash bag, etc). You may have to apply more than one coat. If that’s the case, follow the instructions on the paint can for applying a second coat. Make sure you get all angles of the jar and in all the crevices in between the letters. Let the paint dry completely, at least 1 hour.
Step 4: Remove the tape and letters

After the paint is completely dry remove the plastic bag and painters tape. If you notice that some parts of the paint are peeling away, stop and let the paint dry for at least another hour. When the tape comes of clean then it’s ok to remove the foam letters. If the letters are difficult to remove and are not coming off in one piece, use your fingernail or a butter knife to scrape away the foam.
If you’re feeling creative, finish off by drawing different patterns on top of the paint, with Sharpie markers.
*This post originally appeared on my former blog, Kept. While that blog has since retired, all the content transferred is up-to-date and my own.